The Best Basic White Bread (from a Sponge) recipe is relatively easy but takes a little time. What's a sponge? It is a refrigerated bread starter that you make the night before you want to make bread. And it makes the bread taste divine. Homemade bread is so amazing, isn't it? And not hard to make.
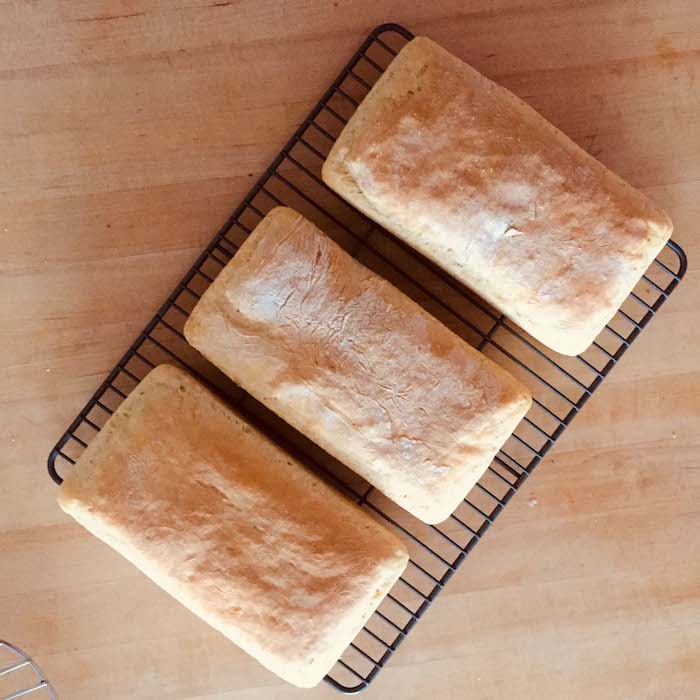
The Best Basic White Bread from a Sponge recipe makes 3 standard loaves.
Basic White Bread
I love everything about bread. The soft, pliable texture of working the dough. The amazing miracle of nature that makes it rise. The aroma filling the house as it bakes. The splattering of crumbs as it is sliced.
The crunchy crust and the soft, tantalizing inside—slathered with butter, wrapped around a piece of chocolate, dipped in olive oil, coated with milk and egg, and fried into French toast—and even just plain. This is the best basic white bread recipe that I know about, and it's easy enough for a beginner.
The Sponge for White Bread
Years ago, I would make sourdough bread from a starter kept in the fridge. Have you ever done that? It's hard to keep it going. We’d take a vacation and the starter would be neglected and show its displeasure by dying. Plus the pressure to make bread every week took the pleasure out of it.
Then I discovered the sponge. It's a suitable substitute for sour dough but with much less hassle. One caveat is that you need to plan ahead. It is recommended that the sponge be made the night before but I often skip this and make the sponge and the bread all in one day and the bread is always perfect so it is up to you how you proceed.
You can bake this bread in any shape from square loaf to round loaf to baguette. I prefer the baguette.
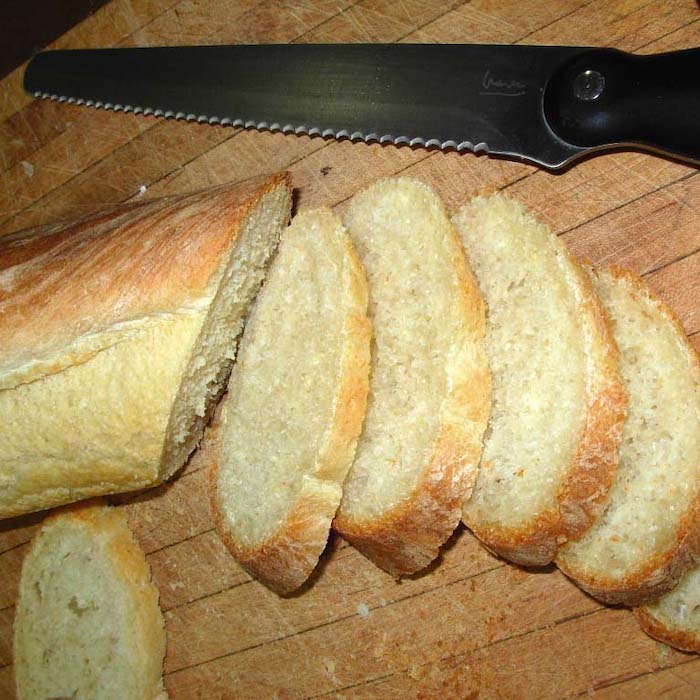
The Best White Bread (from a Sponge) is crusty on the outside and soft on the inside.
What You Need
For this recipe, you need a big bowl, loaf pans or baguette pans, measuring cups and spoons, and a big appetite. Get yourself a nice serrated bread knife, too.
Basic White Bread and Sponge Recipe
Reading through the recipe, you will see I spritz the oven with water before baking the bread. Are you wondering about spritzing the water into the oven? That makes for a hard, crunchy crust just like the bread I used to buy from the boulangerie when I lived in France as a boy.
Ingredients
The Sponge
- 1 cup warm water about 115 F
- 1 Tablespoon dry yeast
- 1 Tablespoon sugar or honey
- 1 ½ teaspoons salt
- 1 ½ cups bread flour
The Bread
- The sponge from above.
- 4-5 Cups bread flour
- 2 Cups warm water
- ¼ Cup Vegetable oil (I use canola)
Instructions
The Sponge
-
Dissolve the yeast in the water for about 10 minutes. Add the sugar or honey, whichever you are using)
-
The yeast mixture should begin to bubble.
-
Place the salt and the flour in a bowl of at least 8 cups of volume.
-
Add the yeast/water mixture and stir with a wooden spoon until the dough comes off the sides of the bowl in strings. About 2 minutes.
-
The dough will be slightly sticky. (You may need to add a little flour if it is too wet or a little water if it is too dry. If you have never made bread before don’t fuss about it. You’ll be ok.)
-
Now you have a choice. You can continue with the bread steps (skipping the part about refrigerating the dough), or you can do the next two steps and come back to make the bread tomorrow morning. If you skip the refrigeration, cover the bowl with plastic wrap and set it aside in a warm spot until it doubles in bulk. This may take 45 minutes or an hour.
-
Cover the bowl with plastic wrap and refrigerate overnight.
-
When you take it out in the morning (I always bake in the early part of the day), the sponge should have doubled in bulk.
The Bread
-
Dump the sponge you previously made into a large mixing bowl (unless you used a large mixing bowl to refrigerate it in).
-
Give the sponge a good stir with a clean wooden spoon.
-
Slowly add the flour to the sponge (½ cup at a time) alternating with some water until all the flour is incorporated and the dough holds together in a ball that is slightly sticky to the touch. (If it is too sticky work in a little more flour.)
Knead
-
Turn the dough onto the counter and knead for 10 minutes. This gets the gluten working and makes for the lovely, airy texture.
First Rise
-
Coat the bottom and part way up the sides of a large bowl with some of the vegetable oil.
-
Put the bread dough in the bowl and then turn it over to have an oiled side up.
-
Cover with a clean dish cloth or plastic wrap and set in a warm draft free place for about an hour. (I turn on the electric oven for a couple of minutes, just until the element starts to glow, then turn it off and let the bread proof in the warm oven.)
Punch Down & Second Rise
-
When the bread has doubled in bulk, turn it out onto the counter and punch it down.
-
Divide it into the number of equal pieces for the quantity of loaves you are making. This recipe makes 4 large baguettes or 8 small ones. For round loaves, divide the dough into 2 or 3 pieces. Shape the round loaves, into balls then lightly press them down to about 3 inches thick. If you are using standard loaf pans, it makes 3 loaves.
-
For baguettes roll the dough into long thin pieces a couple of inches shorter than the baguette pans.
-
Oil a couple baking sheets and place one round loaf on each. For baguettes, oil the baguette pans and lay the long pieces of dough in each one.
-
Again cover and let the dough rise again until double in bulk.
Bake & Cool
-
Preheat the oven to 450F degrees.
-
When the oven is hot, spritz water onto the sides of the oven and close the door for 2 minutes.
-
Then place the bread in the oven.
-
After a minute, again spritz the sides of the oven with water.
-
Close the door and bake round or rectangular loaves about 30–35 minutes, baguettes for 20-25 minutes.
-
The bread is done when the crust is a lovely shade of brown and it sounds hollow when you tap on it.
-
Remove the bread from the oven and cool on racks until it is completely cool, at least 3 hours.
The Best Basic White Bread from a Sponge
Author: Recipe Idea Shop
Ingredients
The Sponge
- 1 cup warm water about 115 F
- 1 Tablespoon dry yeast
- 1 Tablespoon sugar or honey
- 1 ½ teaspoons salt
- 1 ½ cups bread flour
The Bread
- The sponge from above.
- 4-5 Cups bread flour
- 2 Cups warm water
- ¼ Cup Vegetable oil (I use canola)
Instructions
The Sponge
- Dissolve the yeast in the water for about 10 minutes. Add the sugar or honey, whichever you are using)
- The yeast mixture should begin to bubble.
- Place the salt and the flour in a bowl of at least 8 cups of volume.
- Add the yeast/water mixture and stir with a wooden spoon until the dough comes off the sides of the bowl in strings. About 2 minutes.
- The dough will be slightly sticky. (You may need to add a little flour if it is too wet or a little water if it is too dry. If you have never made bread before don’t fuss about it. You’ll be ok.)
- Now you have a choice. You can continue with the bread steps (skipping the part about refrigerating the dough), or you can do the next two steps and come back to make the bread tomorrow morning. If you skip the refrigeration, cover the bowl with plastic wrap and set it aside in a warm spot until it doubles in bulk. This may take 45 minutes or an hour.
- Cover the bowl with plastic wrap and refrigerate overnight.
- When you take it out in the morning (I always bake in the early part of the day), the sponge should have doubled in bulk.
The Bread
- Dump the sponge you previously made into a large mixing bowl (unless you used a large mixing bowl to refrigerate it in).
- Give the sponge a good stir with a clean wooden spoon.
- Slowly add the flour to the sponge (½ cup at a time) alternating with some water until all the flour is incorporated and the dough holds together in a ball that is slightly sticky to the touch. (If it is too sticky work in a little more flour.)
Knead
- Turn the dough onto the counter and knead for 10 minutes. This gets the gluten working and makes for the lovely, airy texture.
First Rise
- Coat the bottom and part way up the sides of a large bowl with some of the vegetable oil.
- Put the bread dough in the bowl and then turn it over to have an oiled side up.
- Cover with a clean dish cloth or plastic wrap and set in a warm draft free place for about an hour. (I turn on the electric oven for a couple of minutes, just until the element starts to glow, then turn it off and let the bread proof in the warm oven.)
Punch Down & Second Rise
- When the bread has doubled in bulk, turn it out onto the counter and punch it down.
- Divide it into the number of equal pieces for the quantity of loaves you are making. This recipe makes 4 large baguettes or 8 small ones. For round loaves, divide the dough into 2 or 3 pieces. Shape the round loaves, into balls then lightly press them down to about 3 inches thick. If you are using standard loaf pans, it makes 3 loaves.
- For baguettes roll the dough into long thin pieces a couple of inches shorter than the baguette pans.
- Oil a couple baking sheets and place one round loaf on each. For baguettes, oil the baguette pans and lay the long pieces of dough in each one.
- Again cover and let the dough rise again until double in bulk.
Bake & Cool
- Preheat the oven to 450F degrees.
- When the oven is hot, spritz water onto the sides of the oven and close the door for 2 minutes.
- Then place the bread in the oven.
- After a minute, again spritz the sides of the oven with water.
- Close the door and bake round or rectangular loaves about 30–35 minutes, baguettes for 20-25 minutes.
- The bread is done when the crust is a lovely shade of brown and it sounds hollow when you tap on it.
- Remove the bread from the oven and cool on racks until it is completely cool, at least 3 hours.
Nutrition (may vary depending on ingredients and amounts used)
Freeze The Extras
If you are planning to freeze some of the loaves, be sure they are completely cooled before wrapping them and putting them in the freezer. Wrap them in aluminum foil, then place them in a tightly sealed plastic bag and freeze them. When you want to eat the bread, just pop the foil-wrapped loaf into the oven at 350F for about 10 minutes.
The Best White Bread from a Sponge recipe. Easy. Amazing.
More Bread Recipes
- French Bread (wheat)
- Dillie Bread (wheat)
- Jalapeño Cornbread
- Gluten Free Dairy Free White Bread (my best GF recipe)
- Amazing Gluten Free French Bread





Leave a Reply