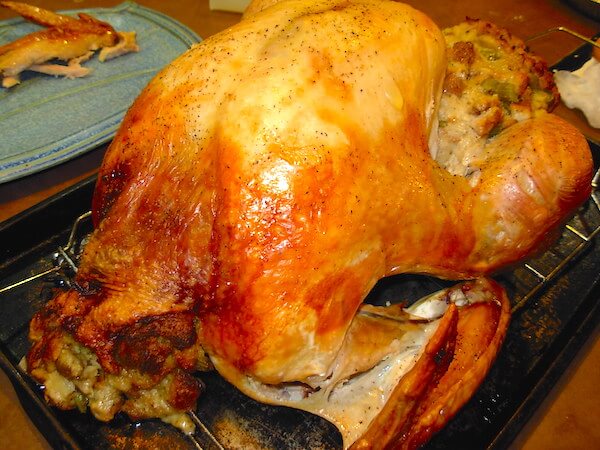
How to select a turkey at the grocery store and cook the turkey so it is perfect every time. The result: mouthwatering, juicy meat with crisp, brown skin, just like Grandma used to make. And only three ingredients!
Jump to:
- What You Will Learn About Buying And Cooking A Turkey
- Why You'll Love This Recipe
- What To Serve With Turkey
- Ingredients And Tools Needed
- Selecting The Turkey: Organic or Non-Organic, Fresh Or Frozen
- The Best Pan For Cooking Turkey
- How To Keep Or Thaw A Raw Turkey
- How To Know The Turkey Is Done
- Substitutions and Variations
- How to Cook a Turkey
- Expert Tips For Cooking The Turkey
- Recipe FAQs
- More Help For Cooking Turkey
- How to Cook a Turkey Recipe
What You Will Learn About Buying And Cooking A Turkey
- Whether to buy a fresh or frozen turkey is entirely your choice. I will share with you the pros and cons of buying a fresh, organic turkey vs. a frozen turkey. If you choose a frozen turkey, I have tips on which one to buy. I also give you various ways to safely defrost your frozen turkey.
- How long does it take to bake a turkey, con size? Three simple tricks will ensure that you bake it perfectly every time. I share these cooking hacks with you below.
- What kind of pan to use to cook a turkey? In my opinion, the easiest and best way to bake it is in a Nesco Roaster (more on the benefits of this method later). But you can bake it in a standard oven in the right pan - a roasting pan with a lid and a rack.
- Whether to cover the pan when making a turkey. The simple answer is yes. Cover the turkey for about 15 minutes before taking it out. Then, take the cover off to help the skin brown.
- How to season a turkey perfectly. You only need a little salt and pepper, but you can add herbs if you like.
- What not to do when cooking a turkey. Most importantly, do not pierce the turkey's skin while baking! You will let the wonderful juices out and it will be dry. Also, be sparing with salt. Remember you can add salt after it is cooked, but you cannot take it out!
Why You'll Love This Recipe
- It only takes 3 ingredients - what's easier than that? Turkey, salt, and pepper.
- It is a fix-it-and-forget-it recipe - It's quick and easy to prepare. Rinse, put it in the roaster, and sprinkle with salt and pepper. Once you put the turkey in the oven or free-standing roaster, seal it on high heat. Then turn the temperature down. Boom! You're done. Now you can sit back and enjoy your day. A few hours later, your turkey is perfect! No fuss.
- It takes the worry out of cooking a turkey - This recipe answers all your questions so you can make a perfect, absolutely scrumptious turkey without fail.
What To Serve With Turkey
Well, you will want to have all the trimmings for Thanksgiving, right? My favorites are mashed potatoes, candied sweet potatoes, green bean casserole, dressing, gravy, and pecan pie.
Ingredients And Tools Needed
You will need the following ingredients: a fresh or frozen turkey (any size), salt, and pepper. So simple! If you are filling the turkey cavity with dressing, you will need some premade traditional sage dressing/stuffing.
The tools required are a Nesco Roasting Pan or a covered roasting pan with a lift-out rack and a turkey baster. Cooking a turkey in a Nesco is super easy, and the turkey is scrumptious.
Selecting The Turkey: Organic or Non-Organic, Fresh Or Frozen
Some people think that a fresh, organic turkey is best. They say it tastes better. I have not found that to be true. I think it tastes the same. But there are other advantages to a fresh, organic turkey.
Advantages of a fresh organic turkey
For one, you don’t have to thaw it.
And when you purchase an organic turkey, you know the meat is not filled with chemicals and antibiotics.
If eating organic products is important to you, know that you will pay a high premium for a fresh, organic turkey. And you have to order it ahead to get it on time.
Frozen turkeys are also available organically. Again, they’ll cost a premium, but the cost is usually slightly lower than for a fresh turkey.
Advantages of a frozen non-organic turkey
I customarily buy frozen, nonorganic turkeys. I like the “Butterball” turkeys because they are deliciously plump and always of good quality. The price is generally reasonable and in the middle of the price range.
With a Butterball turkey, you can rely on the quality. And you can tell the turkey is ready because it has a standard pop-up turkey timer. That’s right. Look at the breast. There’s a little plug that’s been inserted in it. The plug pops up when it’s done. It takes the guesswork right out of cooking a turkey.
But don’t worry, if you’ve already purchased a frozen turkey without the built-in pop-up timer, our recipe will tell you how to know if your turkey is done. Store-brand turkeys will be almost as juicy as the name brands. And a lot cheaper!
The Best Pan For Cooking Turkey
My first choice for baking a turkey is the Nesco Classic Roaster Pan. Baking a turkey in a Nesco has many advantages. It is free-standing, meaning you can put it on the counter to cook the turkey. That leaves the oven open for all the delicious sides and pies!
Why do I love my Nesco?
That’s easy. I’ve had it forever and it keeps working perfectly.
The removable cookwell and rack allow easy clean up. And the lift-out rack makes taking the turkey out of the pan almost effortless. The rack has attached handles to make lifting the turkey out trouble-free.
The domed lid comfortably accommodates a large turkey. And you can cook just about any size turkey in it. My 18-quart Nesco can hold a 20-pound turkey without a problem. But I could use it to cook a small, 10-pound turkey if I didn’t want to make such a large one.
But why would I? Leftover turkey is amazing and you can package it in small amounts and freeze it for later, or try any of these 10 yummy ideas for leftover turkey. So even though there are only two of us in our house, I make a 20-pound turkey. But I digress…
The temperature gauge on the Nesco works just like an oven, with a dial to set it from 200 to 450 degrees. It holds the temperature you set. And a turkey cooked in the Nesco Roaster comes out deliciously moist and flavorful. You can even bake a dressing-stuffed turkey with excellent results.
In addition to baking, the Nesco Roaster can roast, steam, slow cook, or cook just about anything an oven can. One pan to do everything. For hands-free, leave-it-be baking, you can’t beat the Nesco Roaster.
How To Keep Or Thaw A Raw Turkey
If you purchase a fresh turkey, buy it no more than a day or two before you cook it.
Here’s what the USDA says about raw turkey: “... for optimal safety, you should buy a fresh turkey within one or two days of when you plan to serve it. Fresh turkeys, like other fresh meat and poultry, are highly perishable.”
If you decide on a frozen turkey, keep it frozen until just a few days before you plan to cook it. Once removed from the freezer, thaw it in the refrigerator for three to five days until completely thawed.
Place it on a cookie sheet or in a pan to catch the drips. Just to be safe, store it at the bottom of the refrigerator. That way, if it spills over, you won’t get bloody drippings over your other shelves and food.
How to thaw a frozen turkey:
- Thaw a frozen turkey, breast side up, in the refrigerator on a tray.
- Keep the turkey in its original packaging.
- The inside of the refrigerator should be at least 40F degrees.
- It takes about one day of thawing for every 4 pounds.
- Cook the turkey within two days of thawing.
If the turkey is not thawed entirely or you need to speed up the process, you can thaw it in cold water. Here’s how:
- Place the turkey breast in its original packaging in the kitchen sink or in a large cooler.
- Cover the turkey completely with cold water.
- Change the water every 30 minutes (that’s why the sink works best!).
- Plan on 30 minutes per pound to thaw the turkey.
- Cook the turkey within two days of thawing.
Learn more about how to defrost a turkey.
Be sure to wash your hands thoroughly before and after touching the raw turkey.
How To Know The Turkey Is Done
There are three surefire ways to know whether your turkey is done, and you need to plan for a little resting time.
As with any “meat,” you’ll want to let it “rest” for 10 minutes or so after you take it out of the pan. Resting helps the turkey reabsorb some of the liquids that have escaped during cooking to make it nice and juicy.
So turn off your Nesco and let the turkey sit in its liquids for a few minutes before lifting it out of the cooker.
If you are using a traditional pan and oven, remove the pan from the oven and set it on top of the stove or counter for 10 or more minutes to rest before carving it.
Now back to those three ways to tell it’s done.
1. Use a meat thermometer
You’ll need to check three places (assuming you have stuffed the turkey): the thigh, the breast, and the stuffing.
The internal temperature of the thigh should be 180F degrees. The breast should register 170F degrees. And the stuffing should be 165F degrees.
For this method, you will need to have a good idea of when it should be done because you don’t want to poke the turkey multiple times and let the juices escape!
You’ll know the turkey is getting done when the legs start to pull away a bit from the body, and the skin of the turkey is turning brown. But also see No. 2 for the timing.
2. Time it
The standard for baking turkey is to bake it for 20 minutes per pound. So a 20-pound turkey would be 20 pounds x 20 minutes = 400 minutes, or 6 hours and 40 minutes. Plus the 10 minutes of resting time. So plan for 7 hours on this size turkey.
If you are baking an 8-pound turkey, it would be 8 pounds x 20 minutes = 160 minutes, or 2 hours and 40 minutes (plus a resting time of 10 minutes).
3. Buy the right kind of turkey which makes it super easy
Get yourself a turkey with a pop-up timer inserted in the breast. The plug is designed to pop up when the turkey has reached the proper temperature and is done.
Again, watch for the other signs to know it’s ready to eat: brown skin and legs starting to pull away.
Substitutions and Variations
What if you want to make some substitutions or variations of this recipe? Here are a few ideas.
Turkey. You can substitute a turkey breast for a whole turkey, and make it the same way. Bake it covered for 20 minutes a pound.
Herbs. Sprinkle about half a teaspoon of dried herbs, such as Herbes de Provence, Italian seasoning, or rosemary (choose one) on the turkey, along with the salt and pepper.
Garlic & olive oil. For some amazing flavor, thinly slice two cloves of fresh garlic. Lift up the turkey skin and poke the slices under it. Drizzle a couple of tablespoons of olive oil over the top, and sprinkle with salt and pepper.
Onions and garlic. Stuff the turkey with peeled and quartered yellow onions and six to eight peeled cloves of garlic. YUM!
How to Cook a Turkey
Okay. You have all the tools and ingredients. You know what pan you’ll use, which turkey you’ll buy, how to thaw it, and how long to cook it. Let’s look at how to make a turkey in a Nesco or a traditional oven.
- Open the packaging. Do this over the sink to catch the mess. Using scissors, remove the plastic packaging, being careful not to slice into the turkey.
- Remove the turkey parts from the inside of the turkey. Usually, there is a package in the neck and loose parts in the cavity. Some people use these parts to cook on top of the stove to add to the gravy later or to give a treat to their pets. Others simply scatter them around the pot and cook them with the turkey. They do add extra flavor, but you have to be sure to remove them all when you later make the gravy.
- Rinse the turkey with water inside and out.
- Set up your pan so that the feet of the rack are placed on the bottom of the pan, and the handles are in a position that allows you to lift it out after the turkey is placed on it.
- Place the turkey on top of the pan’s rack, breast side up.
- If you are stuffing the turkey, stuff the neck first, making sure the skin totally covers the stuffing. You’ll have to tip the turkey up to stuff it.
- The turkey comes with the legs bound together so it fits in the pan. Unhook the legs so you can stuff the cavity. When you have filled the cavity, hook the legs back into the holder.
- Place the turkey back in the pan, breast side up.
- Sprinkle salt and pepper over the top and sides of the turkey. I use about a teaspoon of salt and a half teaspoon of pepper on my turkey. This is purely according to my taste. I do not like a lot of salt. Remember that you cannot take out the spices once they are added, so err on the side of caution.
- Place the cover on the pan and put the pan in the oven or Nesco roaster, which has been preheated to 425F degrees. Bake for 15 minutes. This helps seal in the juices.
- Turn the temperature down to 325F degrees and bake for the remaining time using 20 minutes per pound as your guide.
- Baste the turkey in its own juices three or four times during its baking time. This helps keep it moist.
- Remove the cover about 15 or 20 minutes before the bird is to be done. This helps the skin of the turkey brown nicely, especially in a traditional oven.
- Turn the Nesco or oven off. Remove the pan from the traditional oven and set the pan on the stovetop or the counter to rest for 10 minutes. If you are making a turkey in the Nesco, just turn it off and let the turkey sit.
- After the 10-minute resting time, lift the whole turkey out with the rack, and place it on a jelly roll pan (cookie sheet with a lip on it). It’s ready to carve and showcase on a platter!
In our house, one person carves the turkey while the other makes the gravy Here's my favorite gravy recipe). Teamwork is best!
Expert Tips For Cooking The Turkey
Do not oversalt the turkey. It is hard to dilute the salt and make it more palatable if there is too much added. Serve salt on the table so guests can add more if they would like.
Begin by cooking the turkey at a high temperature. Preheat the oven or Nesco roasting pan to 425F degrees. Bake it at this temperature for 15 minutes to seal the juices. Then reduce the temperature to 325F degrees to slow cook it to a tasty, tender finish.
Never pierce the skin of the turkey while it is baking. Poking a hole in the skin allows the wonderful juices to run out. It makes the turkey dry. Learn more about roasting a turkey.
Let the turkey rest. Letting the turkey sit (or rest) for 10 minutes before carving it allows the juices to reabsorb into the meat.
Recipe FAQs
What is the right temperature for cooking a turkey?
Bake a turkey at 425F degrees for 15 minutes. Then reduce the temperature to 325F degrees for the balance of the time. Let your turkey rest for 10 minutes after baking before carving.
How long should I cook a turkey?
Bake a turkey for 20 minutes a pound or until the internal temperature of the leg is 180F degrees and the breast is 170F degrees. Stuffing should be 165F degrees.
Buying a fresh turkey or a frozen turkey is a matter of choice and convenience. Purchasing a fresh turkey supports a local farmer. It does not need to be thawed. And it may be healthier if it is organic and raised without antibiotics. A frozen turkey can be purchased ahead of time, usually at a lower cost.
Always leave the packaging intact on the turkey when you thaw it. Thaw a turkey in a pan in the refrigerator for several days. It takes 4 hours per pound to thaw a turkey. Alternatively, you can thaw it quicker in cold water. It must be completely covered in water and the water must be changed every 30 minutes.
Yes. Rinse it inside and out before proceeding with cooking. And be sure to wash your hands.
There is some risk of salmonella with cooking the dressing inside the turkey. If you make sure the temperature of the stuffing is 165F degrees or more, the risk is greatly reduced. If you have vegetarians who will share your meal, cooking the stuffing separately allows you to make only one version of the dressing because everyone could eat it.
The giblets are the internal organs of the turkey, including the heart, liver, gizzard, and neck. Look in the neck cavity and the internal cavity to find them. Some will be in a paper package and some will simply be stuck in the main cavity.
You can cook them and eat them, feed them to pets, or throw them away. They can be cooked separately in a pot. Or sauteed and put into the dressing. Or cooked in the pan alongside the turkey. They are good cut up or shredded and put in the gravy.
You do need a covered pan that fits the turkey. It is beneficial to have one that has a lift-out rack. A Nesco Roaster allows you to roast the turkey without using your oven, thereby freeing up valuable oven space.
Absolutely NOT! The skin holds all the juices in while the turkey is cooking.
More Help For Cooking Turkey
If you used the How to Make a Turkey recipe or any other recipe on my website, please leave a 🌟 star rating and/or a comment to let me know how your family liked it in the comments below. I always appreciate your feedback!
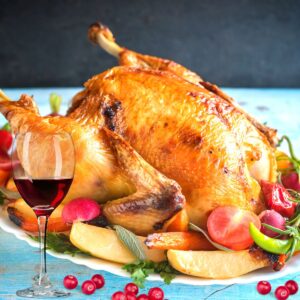
How to Cook a Turkey Recipe
Author: Recipe Idea Shop
Ingredients
- 1 12- pound Turkey or any size
- Salt use sea salt for corn free
- Pepper
- Traditional Sage Stuffing optional
Instructions
- Remove the interior parts of your thawed turkey (usually found in the cavity and in the neck of a store-bought turkey).
- Rinse the turkey inside and out.
- Preheat the oven to 425°F degrees.
- Stuff the bird's cavity with Traditional Sage Dressing (stuffing). (Or cook the stuffing separately to be sure it is safe.)
- Sprinkle the outside of the turkey with a little salt and pepper.
- Place the turkey in the roasting pan or the free-standing roaster. It's best to have one that has a lift-out rack.
- Cover and place in a preheated 425°F degree oven and bake for 15 minutes. This seals the juices in the bird.
- Reduce the heat to 325°F degrees and bake the turkey for 20 minutes a pound (so for a 12 pound bird, you would bake it 12 x 20, or 240 minutes or 4 hours and for a 20 pound turkey, you bake it nearly 7 hours).
- Baste it with its own juices 3-4 times during the roasting time.
- Remove the cover prior to the final 20 minutes and return the pan to the oven. These last few minutes help the turkey to develop a nice, browned skin.
- The legs will start to pull away from the body when it is done. If you are unclear about when it's done, check the temperature with a meat thermometer. The internal temperature of the thigh should be 180F degrees. The breast should register 170F degrees. And the stuffing should be 165F degrees.
- Remove the turkey from the pan to a platter or another pan for carving. Let stand 10 minutes before carving.
Notes
- If you don't eat the skin, turkey is about 162 calories per 4-ounce serving. I think a 12-pound turkey would feed 12 and still have plenty of leftovers. The size of the turkey doesn't matter; you bake it for 20 minutes a pound no matter what size it is.
- Never pierce the skin of the turkey while it is baking. Poking a hole in the skin allows the wonderful juices to run out. It makes the turkey dry.
- Let the turkey rest. Letting the turkey sit (or rest) for 10 minutes before carving it allows the juices to reabsorb into the meat.
Now you are ready to make the best turkey you have ever made. You know how to choose a turkey, prepare it for baking, what kind of pan to use, how long to bake it, and more.
Kathy acquired the blog, Recipe Idea Shop in 2024. She was raised on a farm in Arkansas where having a big garden and good food to eat was the norm. She shares recipes for homemade comfort food and new trending dishes.
Kathy began her blogging journey in 2011 when she founded PetticoatJunktion.com, a home décor blog focused on repurposing and upcycling furniture, and thrift store finds.

